To make adding hiking, horse, moto, and ski trails faster, we've built a slick tool that imports GPS track data from OpenStreetMap (OSM). Admins can use this tool to preview OSM data, using filters that we've set-up to ensure better data quality. As an admin, you can individually import trails or bulk import trails by drawing a rectangle over a map area. Bulk importing the selected OSM trails will bring that data over to Trailforks, adding to the community user base. The Bulk Import tool additionally attempts to detect duplicates and to merge connected trails.
Note: We don't allow mountain biking trails to be imported using this tool. To learn more about adding MTB trails, please see this article. Additionally, any trail added using this tool will be treated slightly different in our database and will always be publicly available for download as per OSM restrictions.
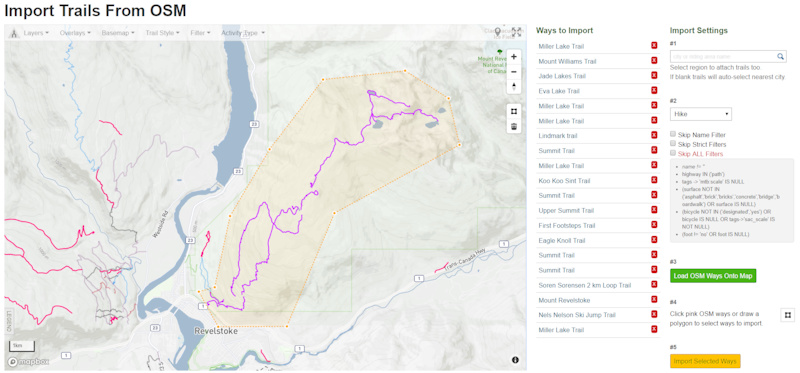
Import trails from OSM data
To help populate trails belonging to alternate activity types (beyond mountain-biking), we have a specific bulk import tool. To use this tool:
1. Zoom in on the area you wish to import trails for, and select the import region or area.
Note: Before importing trails, check that a relevant region has been set-up for your import. Unless you are importing trails to an existing region or city already in the Trailforks database, not specifying a region during import will automatically associate these trails to the nearest city in the Trailforks database.
2. Select the activity on the right-hand side.
3. Filter for OSM trails that are named; these trails will show on the map as pink lines.
Note: The tool will only load data for the region that's currently in view. Additionally, if the data imported is not what you want to see, it could be that the OSM data is not tagged correctly. Dependent on the filters you have checked, you will see more data appearing in view; this data, however, could be incorrect if not tagged correctly. We try to only import data that's been named and tagged accurately to improve the quality of data in the Trailforks database.
4. You can individually select the trails that you wish to import, or you can use the polygon tool found on the right-hand side to draw an area around the trails you want to import.
Note: If you have not manually selected a region on the right-hand side, the trails will import to the nearest city in the Trailforks database. If a region or riding area doesn't exist yet, you can create a riding area by going to the dropdown under 'More,' and selecting 'Contribute.'
Select 'Region,' and then 'Riding Area.' You can label the Riding Area based on the OSM data, and then fill out the corresponding details for the riding area.
Once you've saved that riding area, you can go back to the import tool and select that region for the trail import.
5. The last step in using the bulk import tool is to click 'Import.' The list of trails will shrink as those trails get imported to the Trailforks database.
6. Depending on the primary activity shown on your map, you'll see the trails emphasized or de-emphasized (with a dotted gray line).
Note: When you import trails using the import tool, the tool does not automatically change the counters for the region. You can wait for a script to run that re-syncs the counts, or you can manually edit the region, which will calculate the region statistics.
The data from OSM doesn't have the best naming conventions; many trails can be named very generically.
You can clean up the import by clicking on the 'Red X' button beside the runs or trails you don't wish to import.
Note: the functionalities shown in the video may differ slightly from the UX offered in the app and website today. Trailforks has undergone a number of release updates, and if you have kept your Trailforks app up-to-date, you should see a more updated version of many of these functions shown in the video. We have kept the video up on our help center as it still serves to show users the many features that Trailforks offers!